鸿蒙HarmonyOS实战-ArkUI组件(RelativeContainer)
🚀一、RelativeContainer
🔎1.概述
ArkUI组件中的RelativeContainer是一个相对定位的容器,可以用来将子组件按照相对位置布局。
在RelativeContainer中,每个子组件都可以设置相对于父容器或其他组件的位置和大小。可以通过设置相对位置、偏移量、宽度和高度来实现布局。相对位置可以设置为左侧、上方、右侧和下方。偏移量可以设置为相对位置的偏移值,例如向右偏移10像素或向下偏移5像素。宽度和高度可以设置为相对值或绝对值。
使用RelativeContainer时,要注意避免组件重叠或越出容器边界的情况。可以使用zIndex属性来设置组件的堆叠顺序,避免遮盖问题。同时,也可以使用padding属性来设置内边距,避免组件紧贴容器边缘。
更多鸿蒙最新技术知识点,请关注作者博客:https://t.doruo.cn/14DjR1rEY
RelativeContainer是一个非常灵活的容器组件,可以实现各种复杂的布局效果。
🔎2.设置依赖关系
🦋2.1 锚点设置
在网页中,锚点是指可以跳转到页面中特定位置的链接。设置锚点需要以下步骤:
在 HTML 页面中找到要设置锚点的位置。
在该位置的标签中添加一个 ID 属性,并为其赋一个唯一的值。例如:
Section 1
。在引用该锚点的链接中,将链接目标指向该 ID。例如:Go to Section 1。
当用户点击链接时,页面会自动滚动到设定的锚点位置。
更多鸿蒙最新技术知识点,请关注作者博客:https://t.doruo.cn/14DjR1rEY
但在RelativeContainer中锚点其实是对于的参照物,具体用法介绍如下:
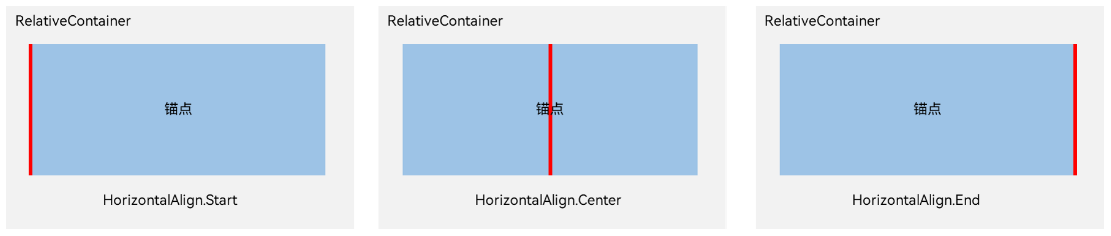
- 在水平方向上,可以设置left、middle、right的锚点。
- 在竖直方向上,可以设置top、center、bottom的锚点。
- 必须为RelativeContainer及其子元素设置ID,用于指定锚点信息。RelativeContainer的ID默认为__container__
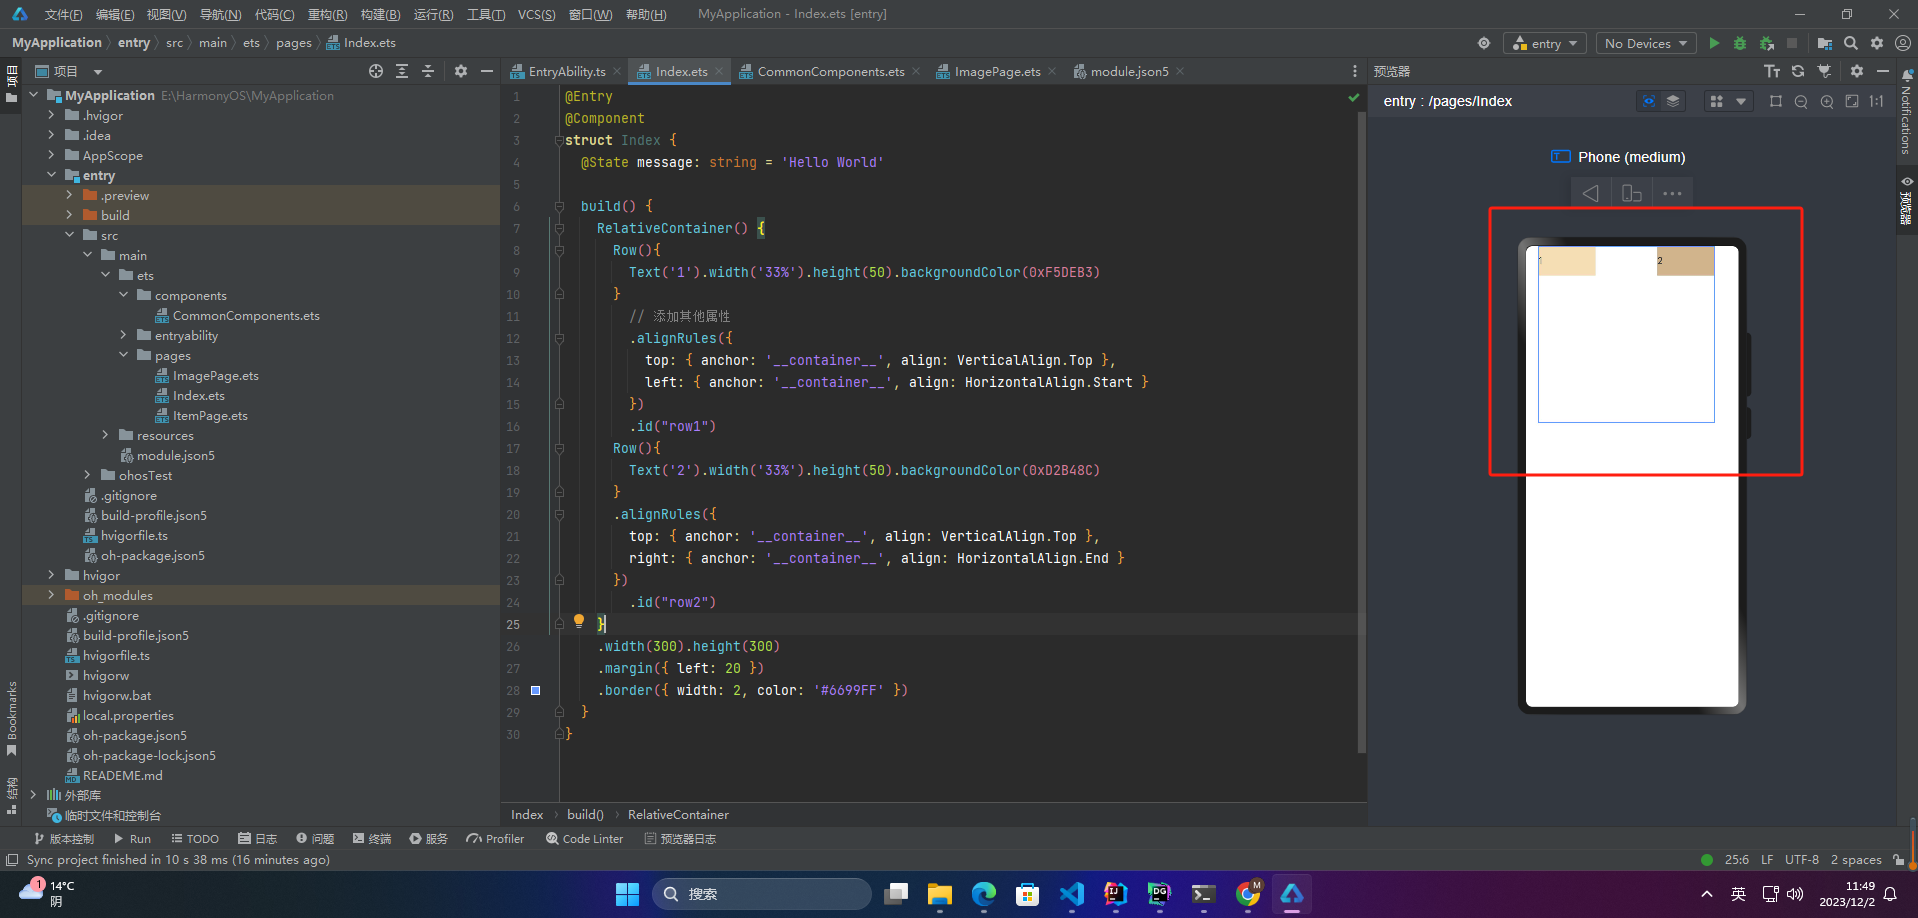
1、RelativeContainer父组件为锚点,__container__代表父容器的id
RelativeContainer() {
  Row(){
    Text('1').width('33%').height(50).backgroundColor(0xF5DEB3)
  }
    // 添加其他属性
    .alignRules({
      top: { anchor: '__container__', align: VerticalAlign.Top },
      left: { anchor: '__container__', align: HorizontalAlign.Start }
    })
    .id("row1")
  Row(){
    Text('2').width('33%').height(50).backgroundColor(0xD2B48C)
  }
  .alignRules({
    top: { anchor: '__container__', align: VerticalAlign.Top },
    right: { anchor: '__container__', align: HorizontalAlign.End }
  })
    .id("row2")
}
.width(300).height(300)
.margin({ left: 20 })
.border({ width: 2, color: '#6699FF' })
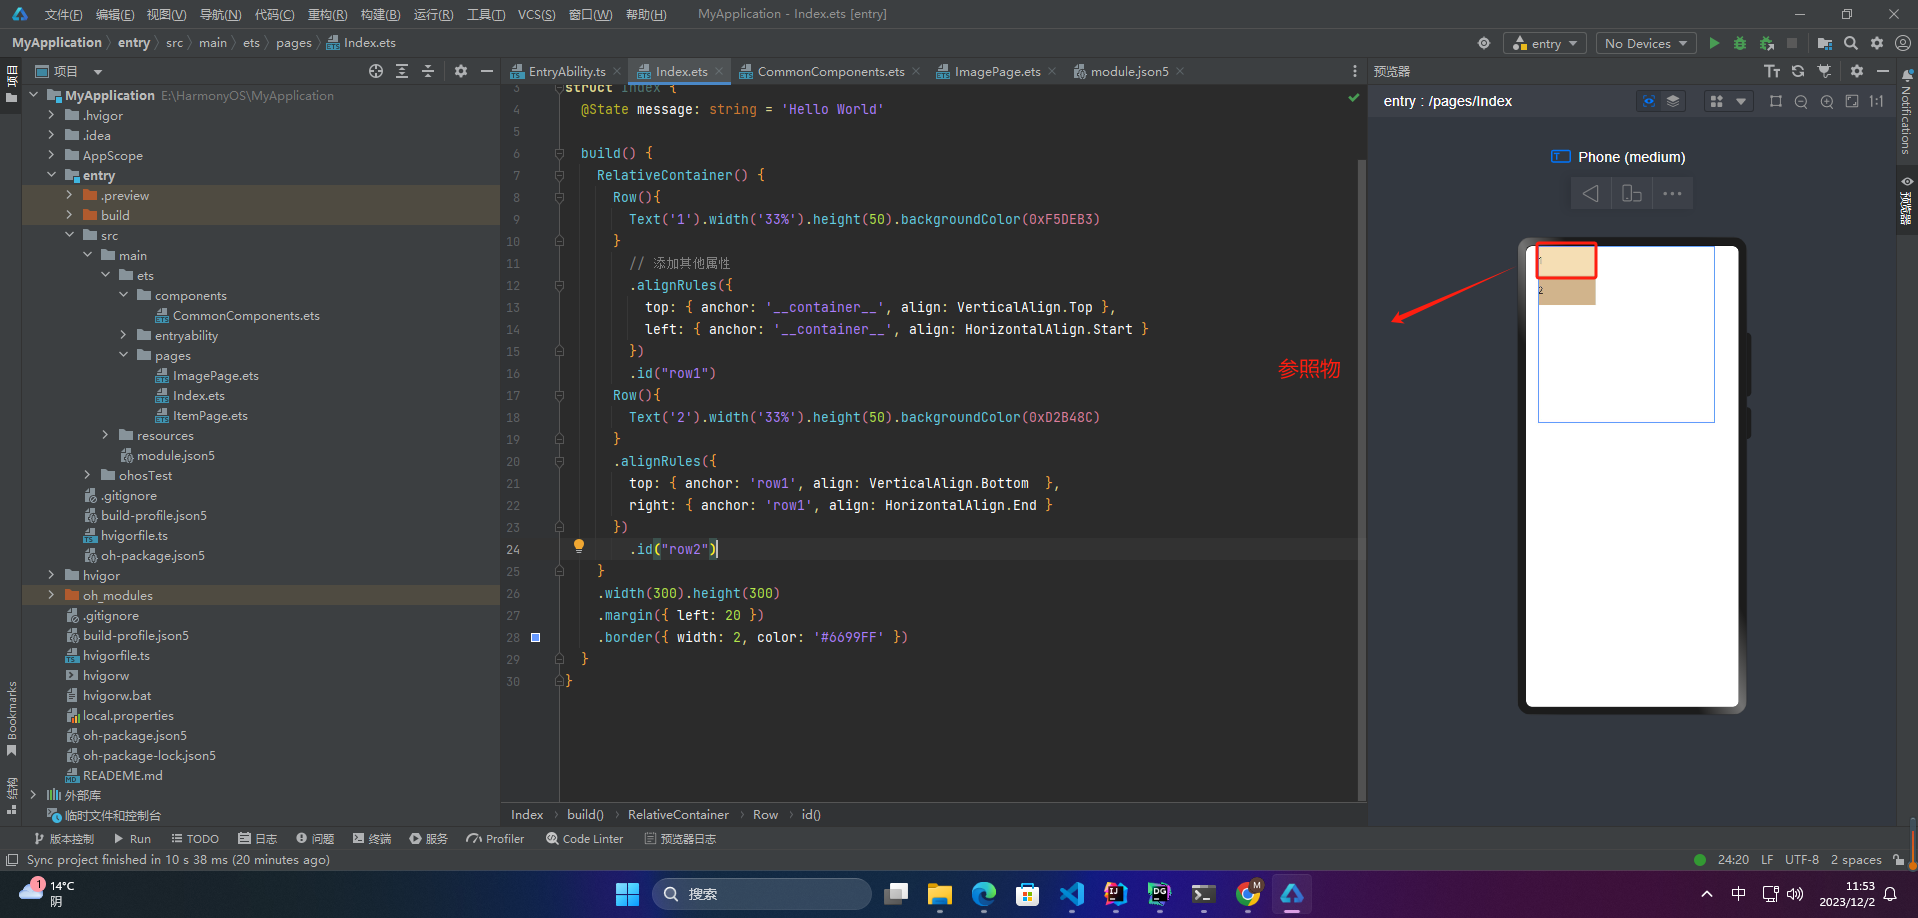
2、以子元素为锚点
    RelativeContainer() {
      Row(){
        Text('1').width('33%').height(50).backgroundColor(0xF5DEB3)
      }
        // 添加其他属性
        .alignRules({
          top: { anchor: '__container__', align: VerticalAlign.Top },
          left: { anchor: '__container__', align: HorizontalAlign.Start }
        })
        .id("row1")
      Row(){
        Text('2').width('33%').height(50).backgroundColor(0xD2B48C)
      }
      .alignRules({
        top: { anchor: 'row1', align: VerticalAlign.Bottom  },
        right: { anchor: 'row1', align: HorizontalAlign.End }
      })
        .id("row2")
    }
    .width(300).height(300)
    .margin({ left: 20 })
    .border({ width: 2, color: '#6699FF' })
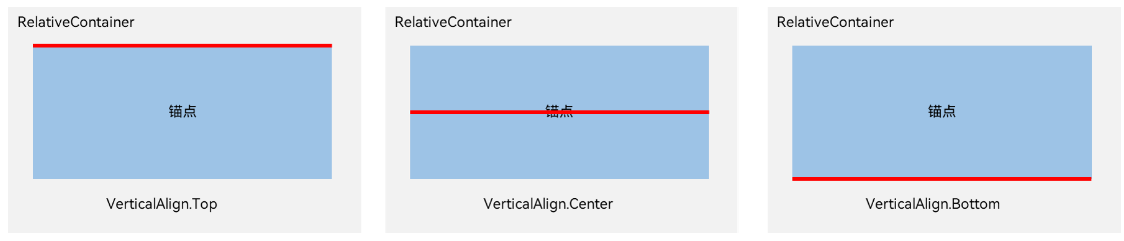
🦋2.2 设置相对于锚点的对齐位置
1、在水平方向上,对齐位置可以设置为HorizontalAlign.Start、HorizontalAlign.Center、HorizontalAlign.End
2、在竖直方向上,对齐位置可以设置为VerticalAlign.Top、VerticalAlign.Center、VerticalAlign.Bottom
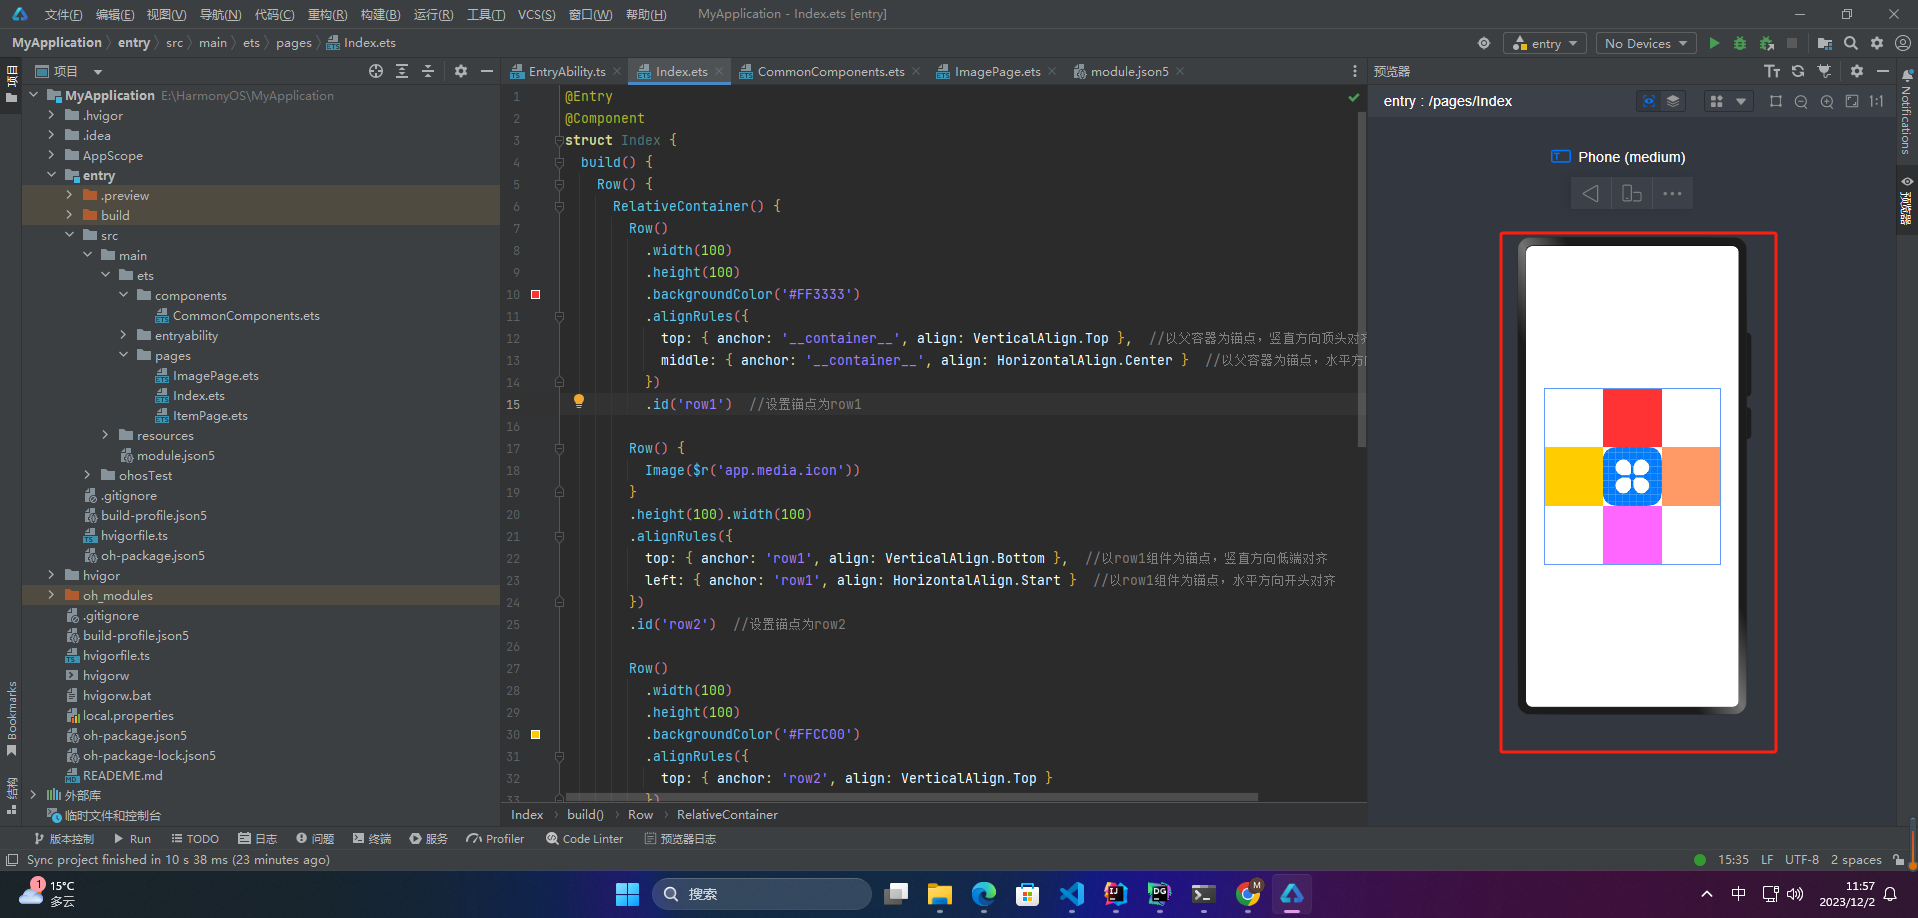
🔎3.案例
@Entry
@Component
struct Index {
build() {
Row() {
RelativeContainer() {
Row()
.width(100)
.height(100)
.backgroundColor('#FF3333')
.alignRules({
top: { anchor: '__container__', align: VerticalAlign.Top }, //以父容器为锚点,竖直方向顶头对齐
middle: { anchor: '__container__', align: HorizontalAlign.Center } //以父容器为锚点,水平方向居中对齐
})
.id('row1') //设置锚点为row1
Row() {
Image($r('app.media.icon'))
}
.height(100).width(100)
.alignRules({
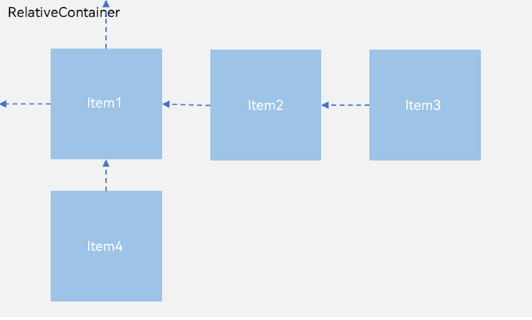
top: { anchor: 'row1', align: VerticalAlign.Bottom }, //以row1组件为锚点,竖直方向低端对齐
left: { anchor: 'row1', align: HorizontalAlign.Start } //以row1组件为锚点,水平方向开头对齐
})
.id('row2') //设置锚点为row2
Row()
.width(100)
.height(100)
.backgroundColor('#FFCC00')
.alignRules({
top: { anchor: 'row2', align: VerticalAlign.Top }
})
.id('row3') //设置锚点为row3
Row()
.width(100)
.height(100)
.backgroundColor('#FF9966')
.alignRules({
top: { anchor: 'row2', align: VerticalAlign.Top },
left: { anchor: 'row2', align: HorizontalAlign.End },
})
.id('row4') //设置锚点为row4
Row()
.width(100)
.height(100)
.backgroundColor('#FF66FF')
.alignRules({
top: { anchor: 'row2', align: VerticalAlign.Bottom },
middle: { anchor: 'row2', align: HorizontalAlign.Center }
})
.id('row5') //设置锚点为row5
}
.width(300).height(300)
.border({ width: 2, color: '#6699FF' })
}
.height('100%').margin({ left: 30 })
}
}
🚀写在最后
- 如果你觉得这篇内容对你还蛮有帮助,我想邀请你帮我三个小忙:
- 点赞,转发,有你们的 『点赞和评论』,才是我创造的动力。
- 关注小编,同时可以期待后续文章ing🚀,不定期分享原创知识。
- 更多鸿蒙最新技术知识点,请关注作者博客:https://t.doruo.cn/14DjR1rEY